How2Setup a bootable Debian distribution for your Raspberry Pi
One of a set of simple easy to use guides for beginners to set up a Raspberry Pi computer.
This SD Card tutorial is the recommended one by the Raspberry Pi Foundation.
I would recommend tutorial 1 instead as this version will allow backups of
images as well, and works with more versions of Windows
I luckily work with Windows PC's, Windows Servers and a whole range of Unix versions
plus Networking so i am happy with most systems.
Most people who will be using will probably come from a Microsoft environment especially
school children who the device is aimed at, so i will provide instructions for a
windows user.
PLEASE NOTE:- To use these instructions you will need a PC with internet access, a
4Gb or greater SDCard, and a PC with an SDCard slot.
1. Firstly we need to download the Operating System from Raspberry Pi so
we need to open a browser window and navigate to
http://www.raspberrypi.org/downloads.
2. What we will use for the Operating System on the Pi is the
Debian "Wheezy" Linux Operating
System - this version is suitable for small devices like the Raspberry Pi.
So lets scroll down and click on the 2012-07-15-wheezy-raspbian.zip link - this may have changed
by the time you install your version, so just click the latest zip file.
This will take you to the detailed download page - so again scroll down and click on
one of the "Mirror Servers" preferably one that is in the same country as you are.
Now just save the download to your usual download location and wait for it to finish
downloading.
3. Its finished at last - that took a while. Now navigate in the operating
system to your download folder and double click the zip file and extract to the same
folder as the zip file is in.
You should now see a folder called [2012-07-15-wheezy-raspbian] that has been extracted
- dont forget this name may have changed since these instructions were written.
Now double click on the folder and in it you will see a 2012-07-15-wheezy-raspbian.img
file which is about 1.9Gb in size.
4. We have the image, now we need to install PC software to write this
image to an SDCARD.
So lets download the Raspberry Pi recommended Writer software [Win32 Disk Imager] from
Softpedia so open this
link in a new window - and then click on the button shown below

Then this one or you will install loads of stuff you dont want

5. Now we have the Disk Imager in zip form, so unzip it and run the
[Win32DiskImager.exe] program and a small window will open - see below.
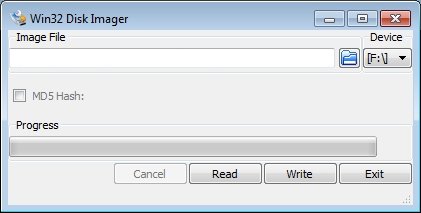
What you should see to the right is the drive on your PC that has the SDCARD in, in
my case its drive F:(Please NOTE some PC's notibly my Dell Inspiron 6400 dont detect
the SDCARD correctly so dont show drives to the right - If so you will need to
borrow someone else's PC).
6. Click on the browse symbol(Folder) on the program then browse to the
location of the 2012-07-15-wheezy-raspbian.img then click [Write], wait a few
seconds then you should see the following Write Successful, if you do then the card can be removed,
and you are ready to boot up your Raspberry Pi.

|
|